|
|
 |

| Books | Stamping | Paper Making | The Muse |
|
|
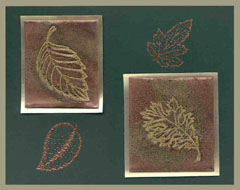
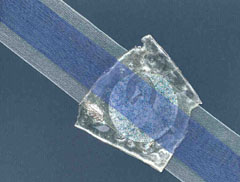
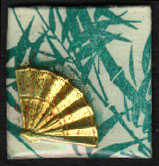
Layered Embossing Directions for layered embossing are here
Layered embossing is a thrilling technique because the results are so immediate (no waiting for ink to dry). You can use either Ultra Thick Embossing Enamel (essentially ultra thick embossing powder, there are many brands) or you can use extra fine embossing powder (some brands call it detail powder). Depending on what type of powder you use, the results will be very different. With the extra fine embossing powder the piece will be opaque and the main color will be from the powder itself. When using the ultra thick embossing powder, the piece will be translucent and any color will be contributed by what you decide to layer into the powder. This technique can be used in so many ways it would be impossible to describe them all. You can make pins, cards, embellishments for journals or scrapbooks, you can even use this technique to make embellishments to decorate boxes! The single most important tip about this technique is to have everything prepared ahead of time (including any embellishments you may use) and to work very quickly. I take the tops off of any embossing powders I will use ahead of time and I ink up my stamp if I’m going to use one. Each layer depends on the previous layer being melted and liquid in order for the following layer to adhere. Here are some basic guidelines for you to try first and then let your imagination run wild! Ultra Thick Embossing Enamel Ultra thick embossing enamel looks like off-white pellets. When heated, it becomes crystal clear. Because it is so heavy, it is important to use either cardboard or mica embossing tiles as the base layer, otherwise your work will curl as it cools. An alternative is to use only very small pieces of heavy card stock (no larger than 1" x 1" or so). Cut your base material to whatever dimensions you want your finished piece to be. Put a piece of Miracle Sheet (at least one distributor calls this Magic Sheet), cut to size, on top of your base material. Peel off the top protective piece of paper from the Miracle Sheet. From this point on, there’s no turning back. Make sure the kids and dogs are settled. I usually keep 2 pieces of 81/2" x 11" paper handy. Pour enough ultra thick embossing powder (EP) onto the piece to completely cover it. To get better coverage, I always pat it down just a little with my fingers. Dump the excess onto one of the pieces of paper. Heat with your embossing tool. Immediately (while the EP is still hot) pour EP on top, pat, dump and heat. Repeat. Rotate the 2 pieces of paper for dumping the EP onto so that you don’t get EP all over the back of your piece. As the EP is clear, you can put embellishments such as small charms (like the sample above), glitter, stamped images that you’ve cut to size (don’t emboss these ahead of time as the EP will disperse into the subsequent layers) and rhinestones between the layers. If you use charms, be sure to add enough layers of EP to completely cover them. The only caveat is to use items that can withstand the heat! A nice effect is to stamp and/or color your base material before you put the Miracle Sheet on it as in the sample above. Extra Fine Embossing Powder This technique is essentially the same as the ultra thick embossing powder technique except the results are dramatically different since the EP is opaque. Again, prepare everything ahead of time and work quickly. If you are going to stamp into your design, set your stamp on top of the pigment ink pad before you begin. You will not be able to put embellishments between the layers as they would not be seen, but you can put glitter or complementary colors of EP on the top layer for a more variegated coloration. The nice thing about using the extra fine EP is that it doesn’t curl the base material as much so heavy card stock will work fine, depending on the size of your finished piece. Proceed as for the ultra thick embossing enamel technique. On the top layer sprinkle your glitter and/or complementary color of EP (work quickly!). Immediately stamp your image into the hot and melted EP. Don’t worry about your stamp. It was created at a higher temperature than your EP will be. The rubber won’t melt. It is best to use a stamp that is deeply etched and doesn’t have too much detail. Leaves and Kokopelli figures are my two favorite designs for this technique. Press firmly so that you get a good, deep image but do not rock the stamp. If you rock the stamp, you’ll get the edges of the stamp in your impression and your lines will be fuzzy rather than crisp. OK, take a deep breath, you can stop hurrying now. Remove the stamp from the EP (if it sticks, just wait for it to cool down a little, it will pull right out). Since you’ve used pigment ink, which dries by absorption and has nowhere to go) you will need to seal the piece with an acrylic sealer. I use Krylon Clear Coat but others work just as well. Just spray a little over the top of the piece. In both of these techniques, cracks may form as the piece cools. If this happens, you can simply reheat with your heat tool and melt the EP again. The cracks will disappear. Depending on the look your are trying to achieve, you can even crack the piece up more for a more rustic effect. Now your piece is ready to either glue onto the front of a card or journal or you can glue a pin back onto it and wear or trade your beautiful art! Note: I own these instructions. You may use them for yourself but I ask that you keep my name attached to them and don't distribute them. Thank you, Christine Cox Email me if you have any questions or comments about this website (or stamping in general). |